
When you mount a cloud drive in Air Live Drive, the files you open don’t just float in the air, they are temporarily stored in a local cache folder on your disk. This is what allows you to open a Google Drive document almost as fast as if it were saved on your SSD. The problem arises when that cache grows unchecked and starts eating up the space you need for other things. In this guide, we’ll walk you through every configuration option so the cache works in your favor.
Where Is the Cache Stored?
By default, Air Live Drive stores the cache in a path inside your Windows profile: C:\Users\YourUser\AppData\Roaming\AirLiveDrive\DisksCache. This means it may be silently consuming valuable space on your main SSD without you realizing it.
The good news is that you can change it easily. In the Disk Configuration window, next to the Cache folder field, you’ll find a Browse button that lets you redirect the cache to any other location, a secondary hard drive, an external HDD, or a different partition. If you have a small SSD (256 GB or less), moving the cache to an HDD is one of the quickest improvements you can make.
Cache Profiles: Choose Your Working Mode
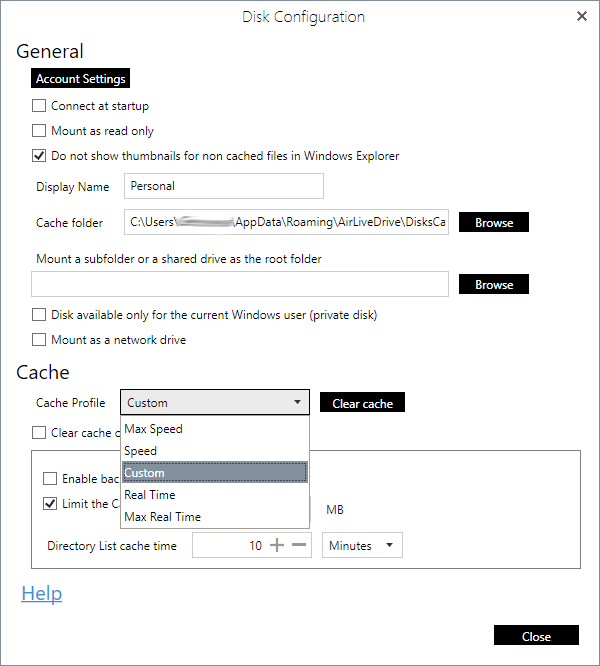
Air Live Drive includes five preconfigured options in the Cache Profile dropdown, each designed for a different type of use. Choosing the right one makes a real difference in speed and disk consumption:
- Max Speed: prioritizes performance above all else. Air Live Drive caches as much as possible so files open at maximum speed. Recommended if you have plenty of disk space and regularly work with the same files
- Speed: a balance between speed and space consumption. A solid choice for most users who open files frequently but don’t want the cache growing out of control
- Custom: gives you full control over every parameter (maximum size, directory list time, background uploads). Ideal for advanced users who want to fine-tune the cache to their exact situation
- Real Time: optimized for collaborative environments where files change constantly. Air Live Drive queries the cloud more frequently to ensure you always see the latest version
- Max Real Time: the most aggressive version of the previous mode. Minimizes the cache to ensure every access reflects the current state of the cloud. Useful when multiple people are editing the same files simultaneously, though it may feel slower on poor connections
Which One Should You Choose?
| Profile | Best for |
|---|---|
| Max Speed | Single user, stable files, large SSD |
| Speed | General use, speed/space balance |
| Custom | Advanced users with specific needs |
| Real Time | Teamwork with frequent changes |
| Max Real Time | Intensive collaboration, critical sync |
If you’re unsure, Speed is the most sensible starting point for most situations.
Limiting the Cache Size
This is arguably the most important setting for protecting your local storage. The Limit the Cache size to option lets you set a maximum cap in megabytes. It often defaults to 2000 MB (2 GB), but you should adjust it based on your available disk space.

Some practical guidelines:
- SSD 256 GB or less: limit cache to 500–800 MB and move it to a secondary drive if possible
- 512 GB SSD: 1–2 GB is a reasonable balance
- 1 TB SSD or more: you can afford 3–5 GB if you regularly work with large files
Without this limit enabled, the cache can grow indefinitely as you open more files from the cloud, and you won’t notice until your disk is full.
Directory List Cache Time: How Long Air Live Drive Remembers
The Directory List cache time parameter controls how many seconds Air Live Drive keeps a folder’s file list in memory before querying the cloud again. The default value is 90 seconds (though it can also be set in minutes).
- Increase it (e.g. to 300 seconds) if you have a slow connection or work with very large folders, this reduces server queries and makes browsing smoother
- Decrease it if you work in a team and files change frequently, so Air Live Drive picks up other users’ changes almost in real time
Clearing the Cache: When and How
Air Live Drive offers two ways to clear accumulated cache:
- Clear cache button: manually wipes all currently stored cache. Useful when you need to free up space quickly or if you’re experiencing errors opening files (a corrupted cache is sometimes the culprit)
- Clear cache on disconnect: enables automatic cache clearing every time you disconnect the drive. Ideal for shared computers or laptops where privacy matters
Keep in mind that after clearing the cache, the next time you open a file from the cloud it will take slightly longer, as it needs to be downloaded again.
Background Uploads
The Enable background uploads option allows Air Live Drive to upload modified files to the cloud silently while you keep working, without waiting for each upload to finish. In most cases, it’s best to leave this enabled.
However, if you have a metered connection or are working with very large files, temporarily disabling it gives you more control over when and how changes are synced.
Recommended Settings by User Profile
| Profile | Cache size | Location | Clear on disconnect |
|---|---|---|---|
| Small SSD (≤256 GB) | 500 MB | Secondary HDD | Yes |
| Standard user | 1–2 GB | Main SSD | Optional |
| Professional / large files | 3–5 GB | SSD or fast NVMe | No |
Taking five minutes to configure these options properly can recover several gigabytes on your drive and deliver a noticeably smoother experience when working with your cloud drives in Air Live Drive.
You can check more information about more features here:
-Run Out of Disk Space? How to Use Cloud Storage as Extra Local Storage
-The Fastest Way to Integrate Google Drive, OneDrive, and Dropbox into File Explorer
-How to Mount Cloud Storage as a Local Drive in Windows
