Get started in three steps

1. Install Air Live Drive

Download the installer for your computer and complete the setup.

Go to downloads

3. Connect and work

Open the connected drive in Explorer or Finder and use your usual applications.

Connect a drive
Air Live Drive installation window
01

Get started

Install Air Live Drive and make your first cloud account available from your desktop.

Install Air Live Drive

WindowsmacOS

Download the correct installer, run the setup wizard and keep the app up to date before adding your first account.

How to do it

  1. Open the Download page and select the Windows or Mac installer.
  2. Run the downloaded installer and follow its on-screen steps; accept the requested system components.
  3. Open Air Live Drive when installation finishes, then use its update check before configuring accounts.
Download Air Live Drive

Why Windows installs Dokan

Windows

Air Live Drive needs the Dokan library installed to work on Windows, so it is included in the installation process.

Dokan is an open-source library that makes it possible to create file systems.

It should be installed together with Air Live Drive. If the app says that it cannot find the Dokan library, you can download it here and install it.

If Windows reports that Dokan is missing, reinstall Air Live Drive to install the required component again.

Enable Air Live Drive in Finder

macOS

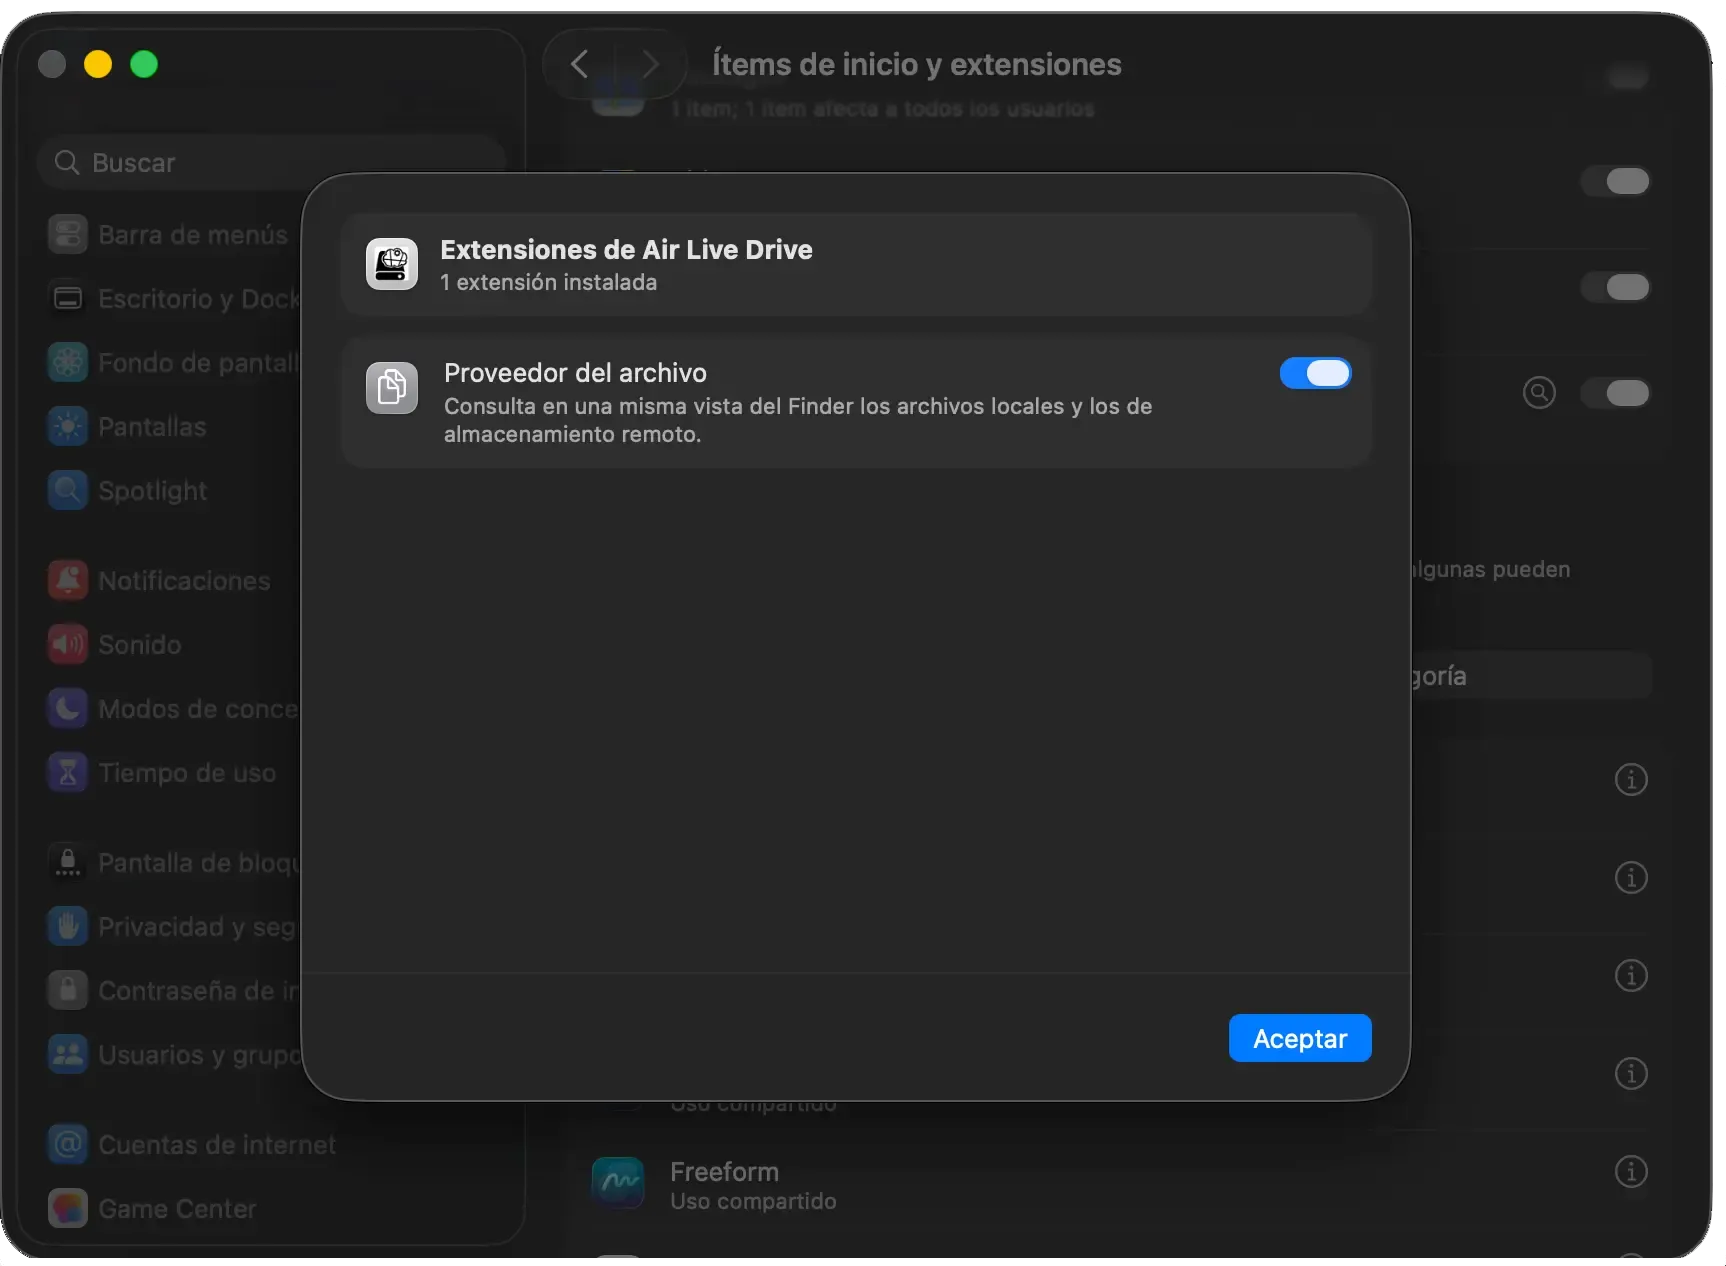
On macOS 13 or later, allow Air Live Drive under System Settings › Login Items & Extensions › File Providers so Finder can show your cloud drives.

How to do it

  1. Install and open Air Live Drive on a Mac running macOS 13 or later.
  2. Open System Settings, then Login Items & Extensions and File Providers.
  3. Enable Air Live Drive, return to the app and connect the account so it appears in Finder.

This approval is required only when macOS has blocked the File Provider extension.
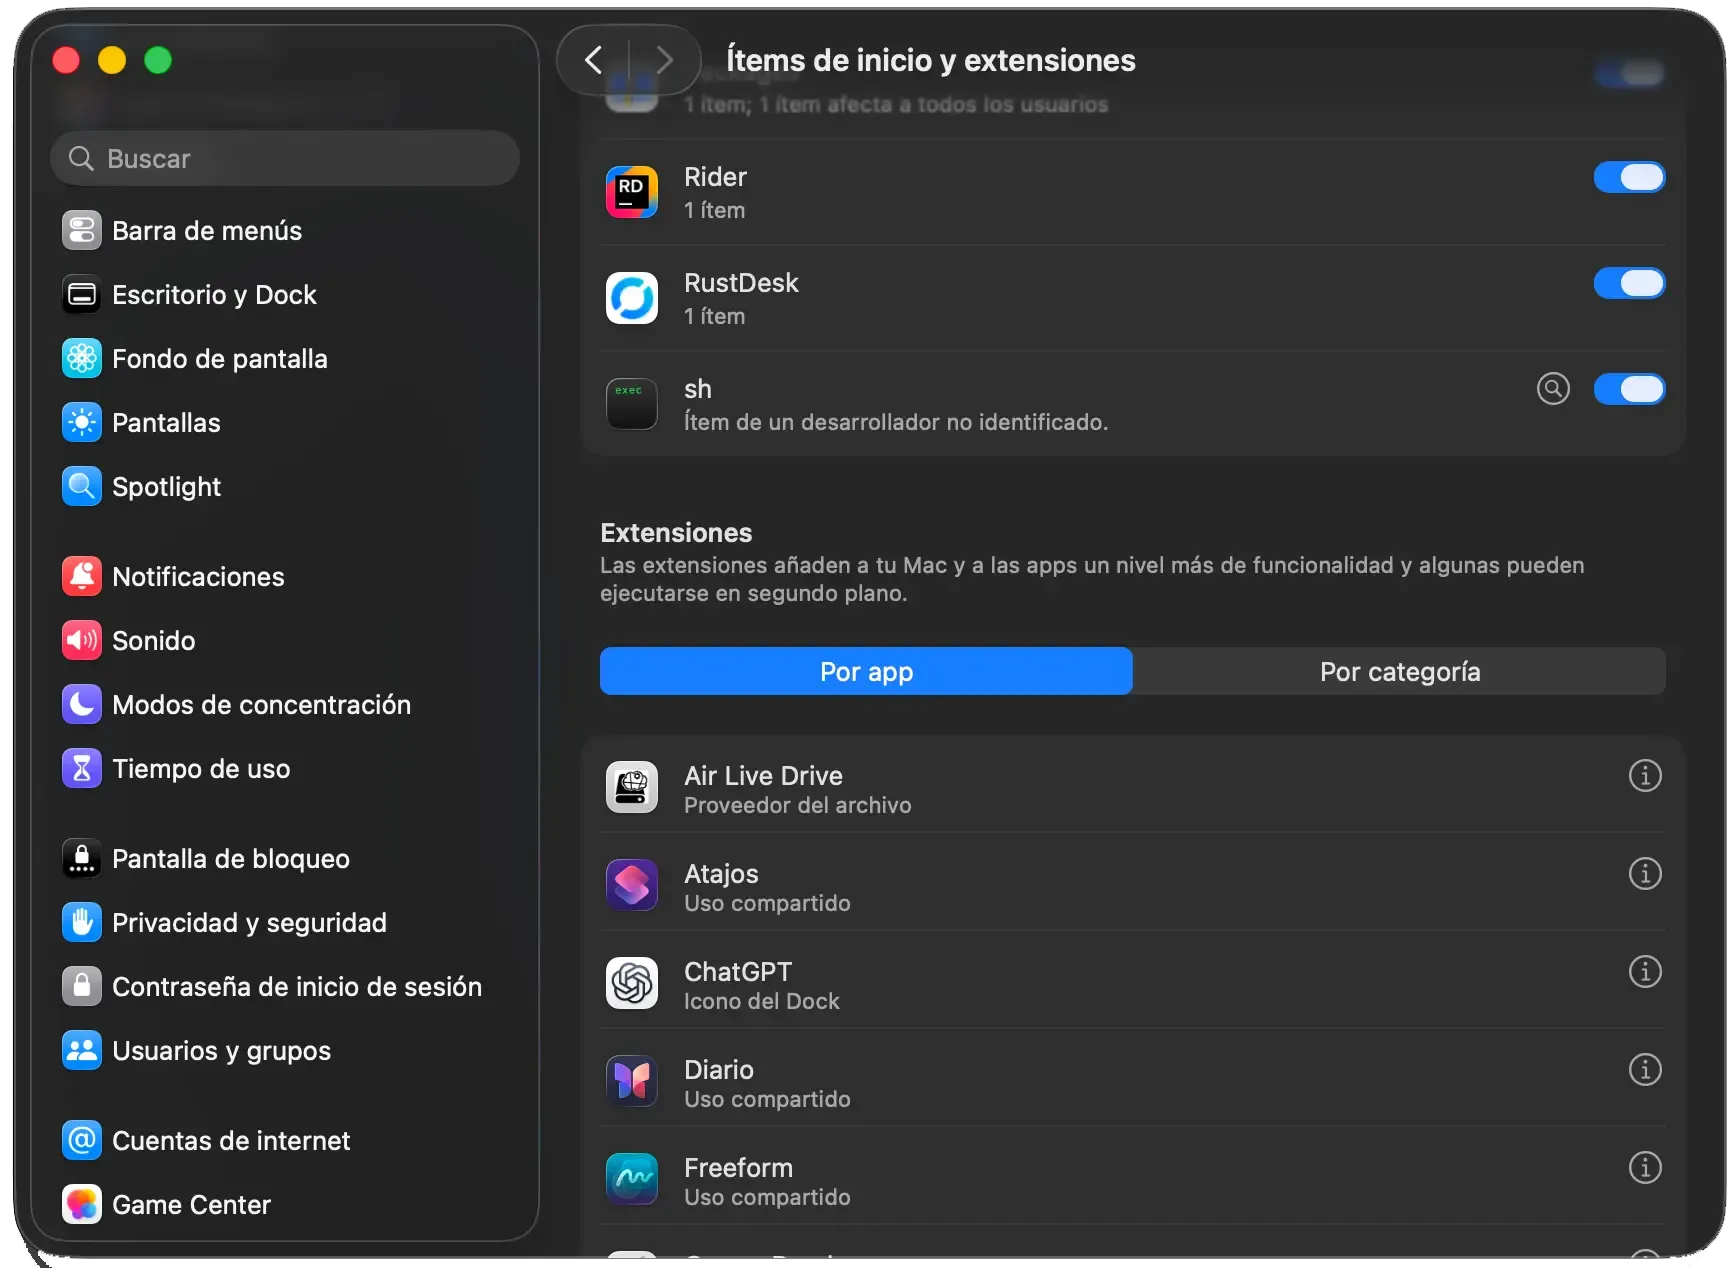
macOS · 1
Enable Air Live Drive in Finder: first macOS setting
macOS · 2
Enable Air Live Drive in Finder: second macOS setting

Add and connect your first drive

WindowsmacOS

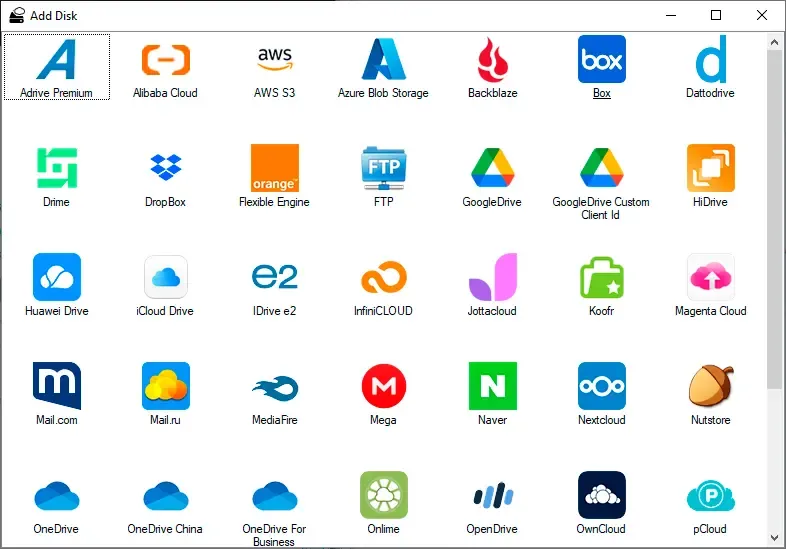
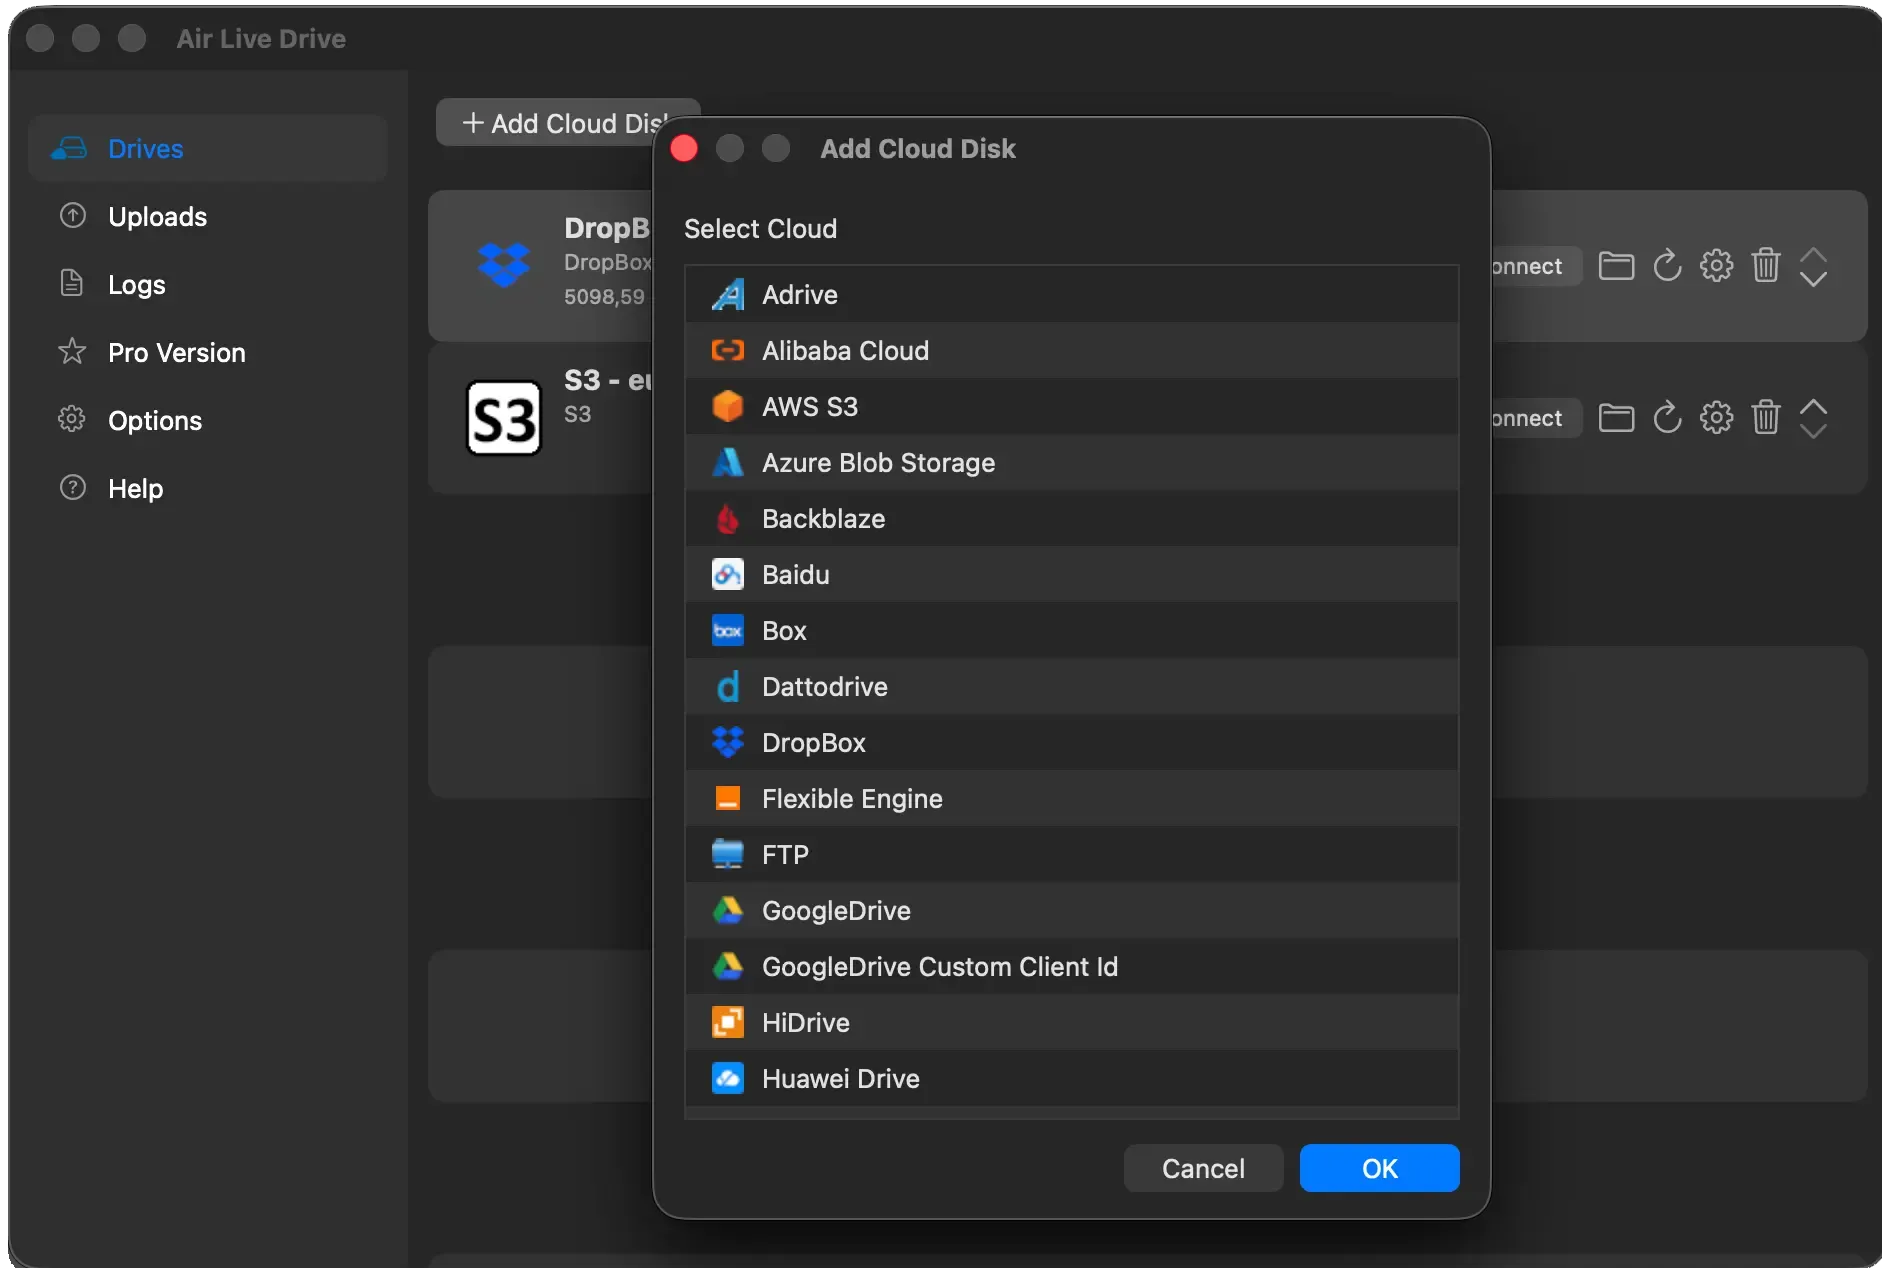
Select a cloud service, complete the provider sign-in and connect the new drive to begin working with cloud files.
How to do it

  1. Choose Add cloud disk in Air Live Drive and select the cloud provider.
  2. Finish the provider's sign-in and permission screen, then confirm the drive settings.
  3. Connect the drive and open it from File Explorer on Windows or Finder on macOS.
Windows
Add and connect your first drive on Windows
macOS
Add and connect your first drive on macOS
Mount cloud storage in Windows
02

Clouds and accounts

Choose a provider, authorize access and tailor each connected account to your workflow.

Use multiple accounts

WindowsmacOS Pro

Add separate drives for personal and work accounts. The free version allows up to three drives and one account per provider; Pro removes these limits.

How to do it

  1. Repeat Add cloud disk for each personal, work or client account you need.
  2. Use a clear drive name or alias so accounts are easy to identify in Explorer or Finder.
  3. Check the Free limits before adding another account from the same provider; use Pro when you need more.

Add a Google OAuth Application ID

WindowsmacOS

Configure a custom Google OAuth client ID when you need to authorize Google Drive with your own Google application identity, without sharing your password with Air Live Drive.

How to do it

  1. Create or select a Google Cloud OAuth client for the Google account or organization that manages it.
  2. Copy the client ID into the Google Drive account settings in Air Live Drive when that advanced option is required.
  3. Authorize the account in Google's sign-in window; never enter your Google password directly into Air Live Drive.
Setup a custom OAuth Client ID for Google Drive

Shared drives and a folder as the root

WindowsmacOS

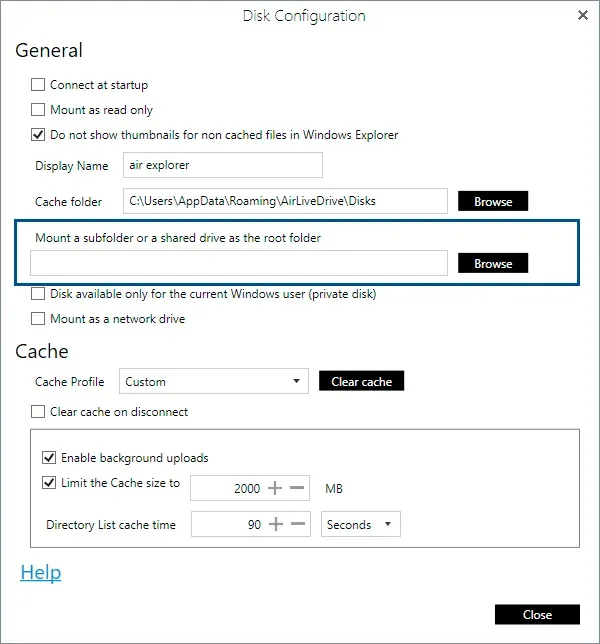
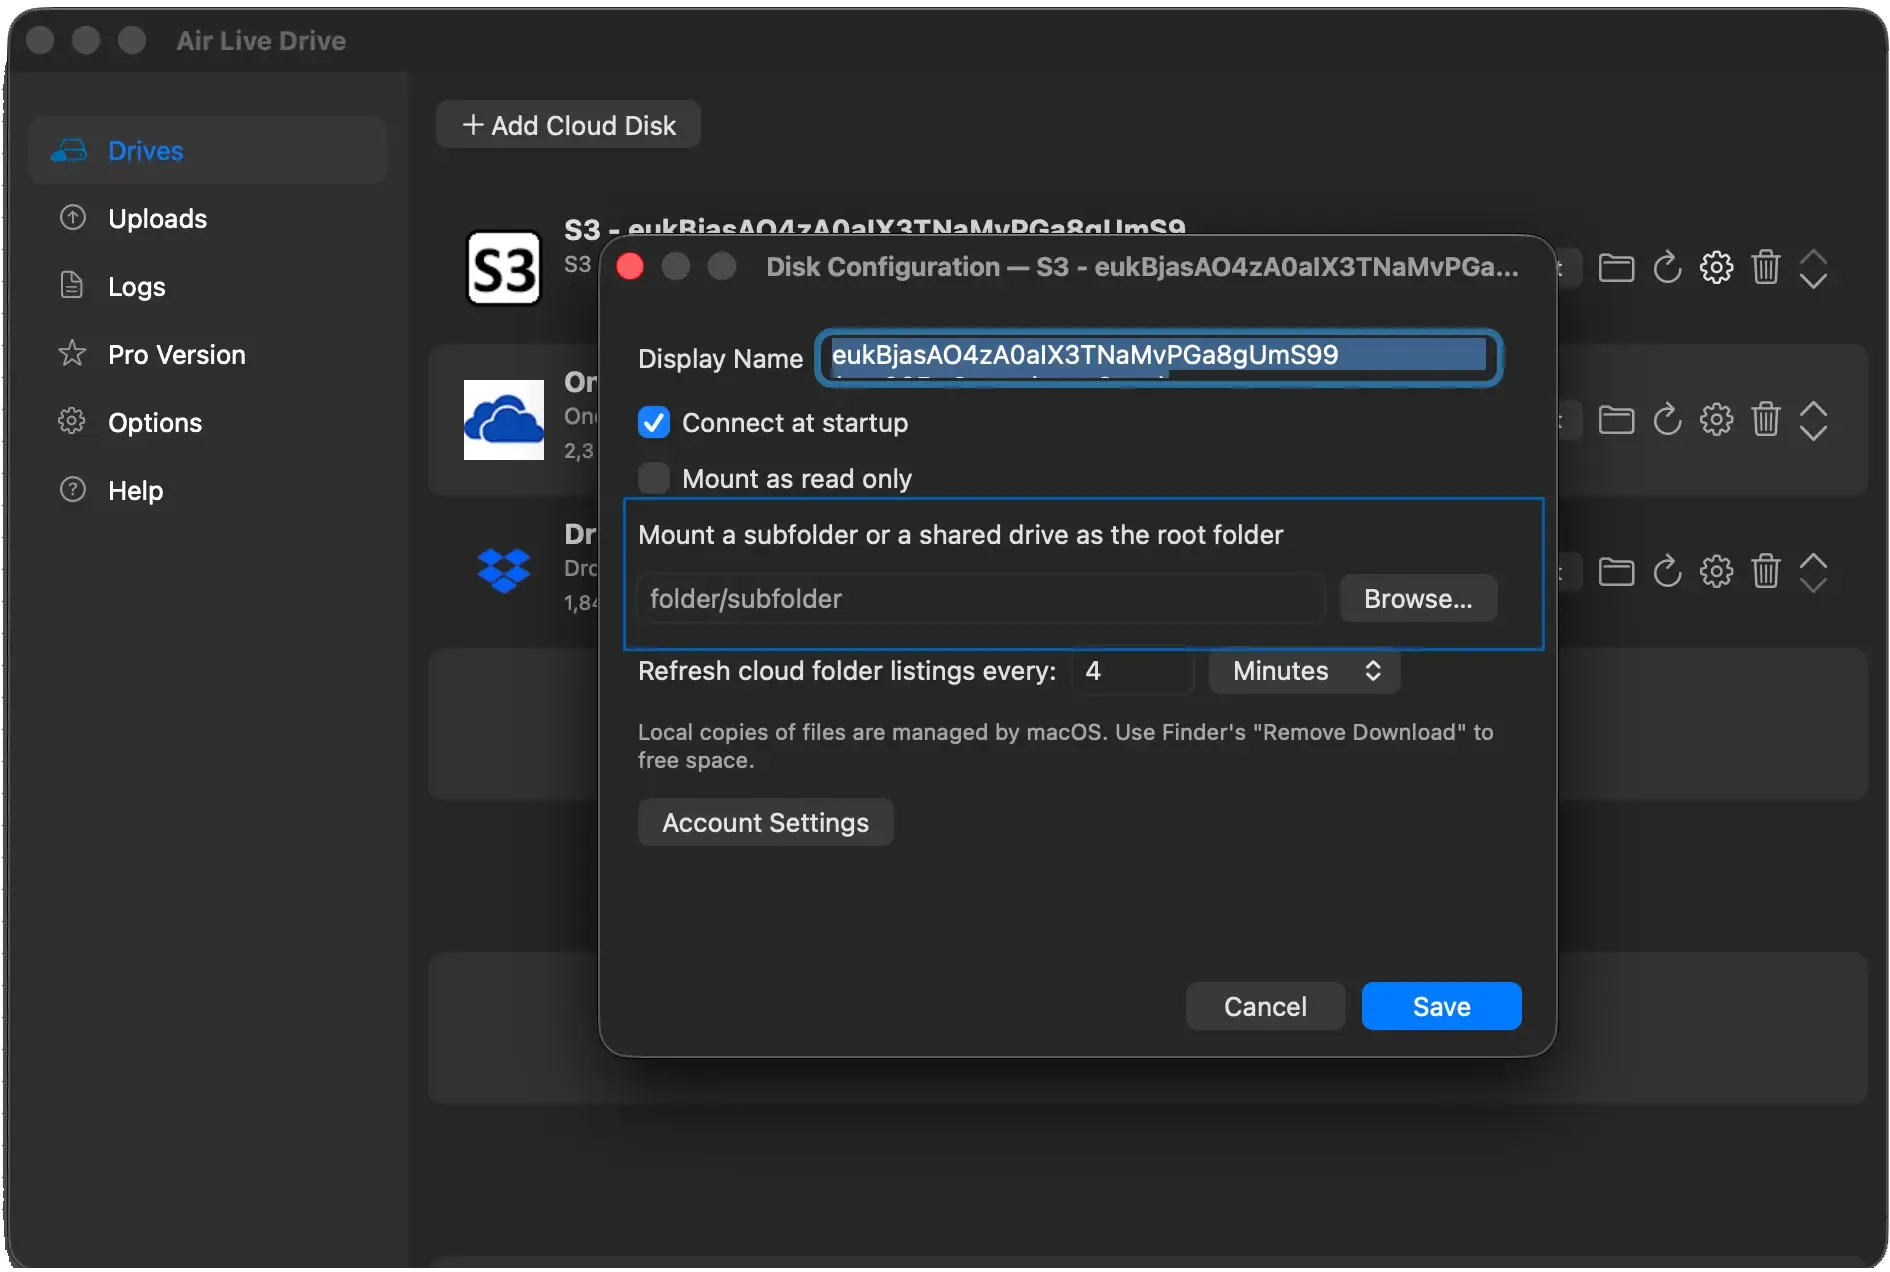
Choose a shared drive or a cloud folder as the root of a drive when you only need a focused part of an account.
How to do it

  1. Add or edit the account that contains the shared drive or folder.
  2. Select the available shared drive, or choose the folder you want to expose as the drive root.
  3. Save the setting, then reconnect the drive and verify that its top level is the selected location.
Windows
Shared drives and a folder as the root on Windows
macOS
Shared drives and a folder as the root on macOS
Use shared drives and folders
03

Drive configuration

Control how every cloud drive appears, connects and behaves on your computer.

Connect, disconnect and browse

WindowsmacOS

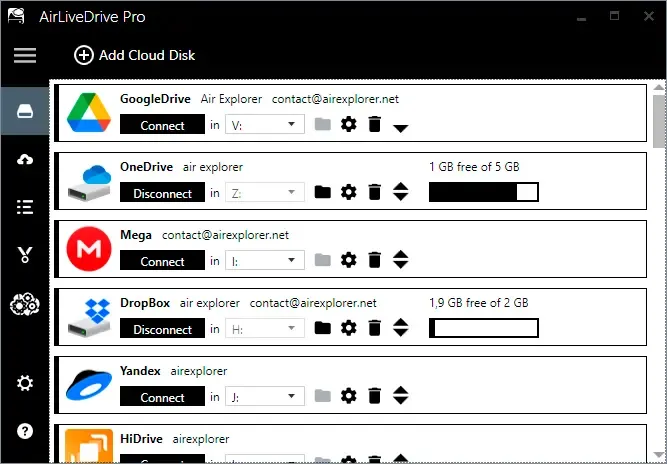
Connect a configured account when you need it, disconnect it to hide it, and open a connected drive directly in Explorer or Finder.
How to do it

  1. Select the configured drive in the main list and choose Connect.
  2. Wait until its status shows it is connected, then use Browse or open Explorer/Finder.
  3. When you no longer need it, select Disconnect; the cloud remains configured for the next time.
Connect, disconnect and browse

Name, start and protect a drive

WindowsmacOS

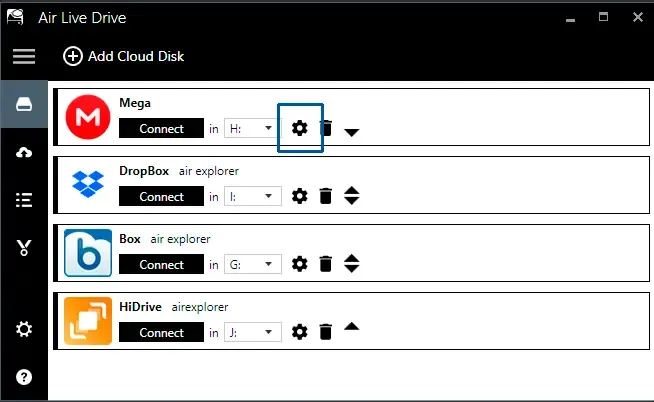
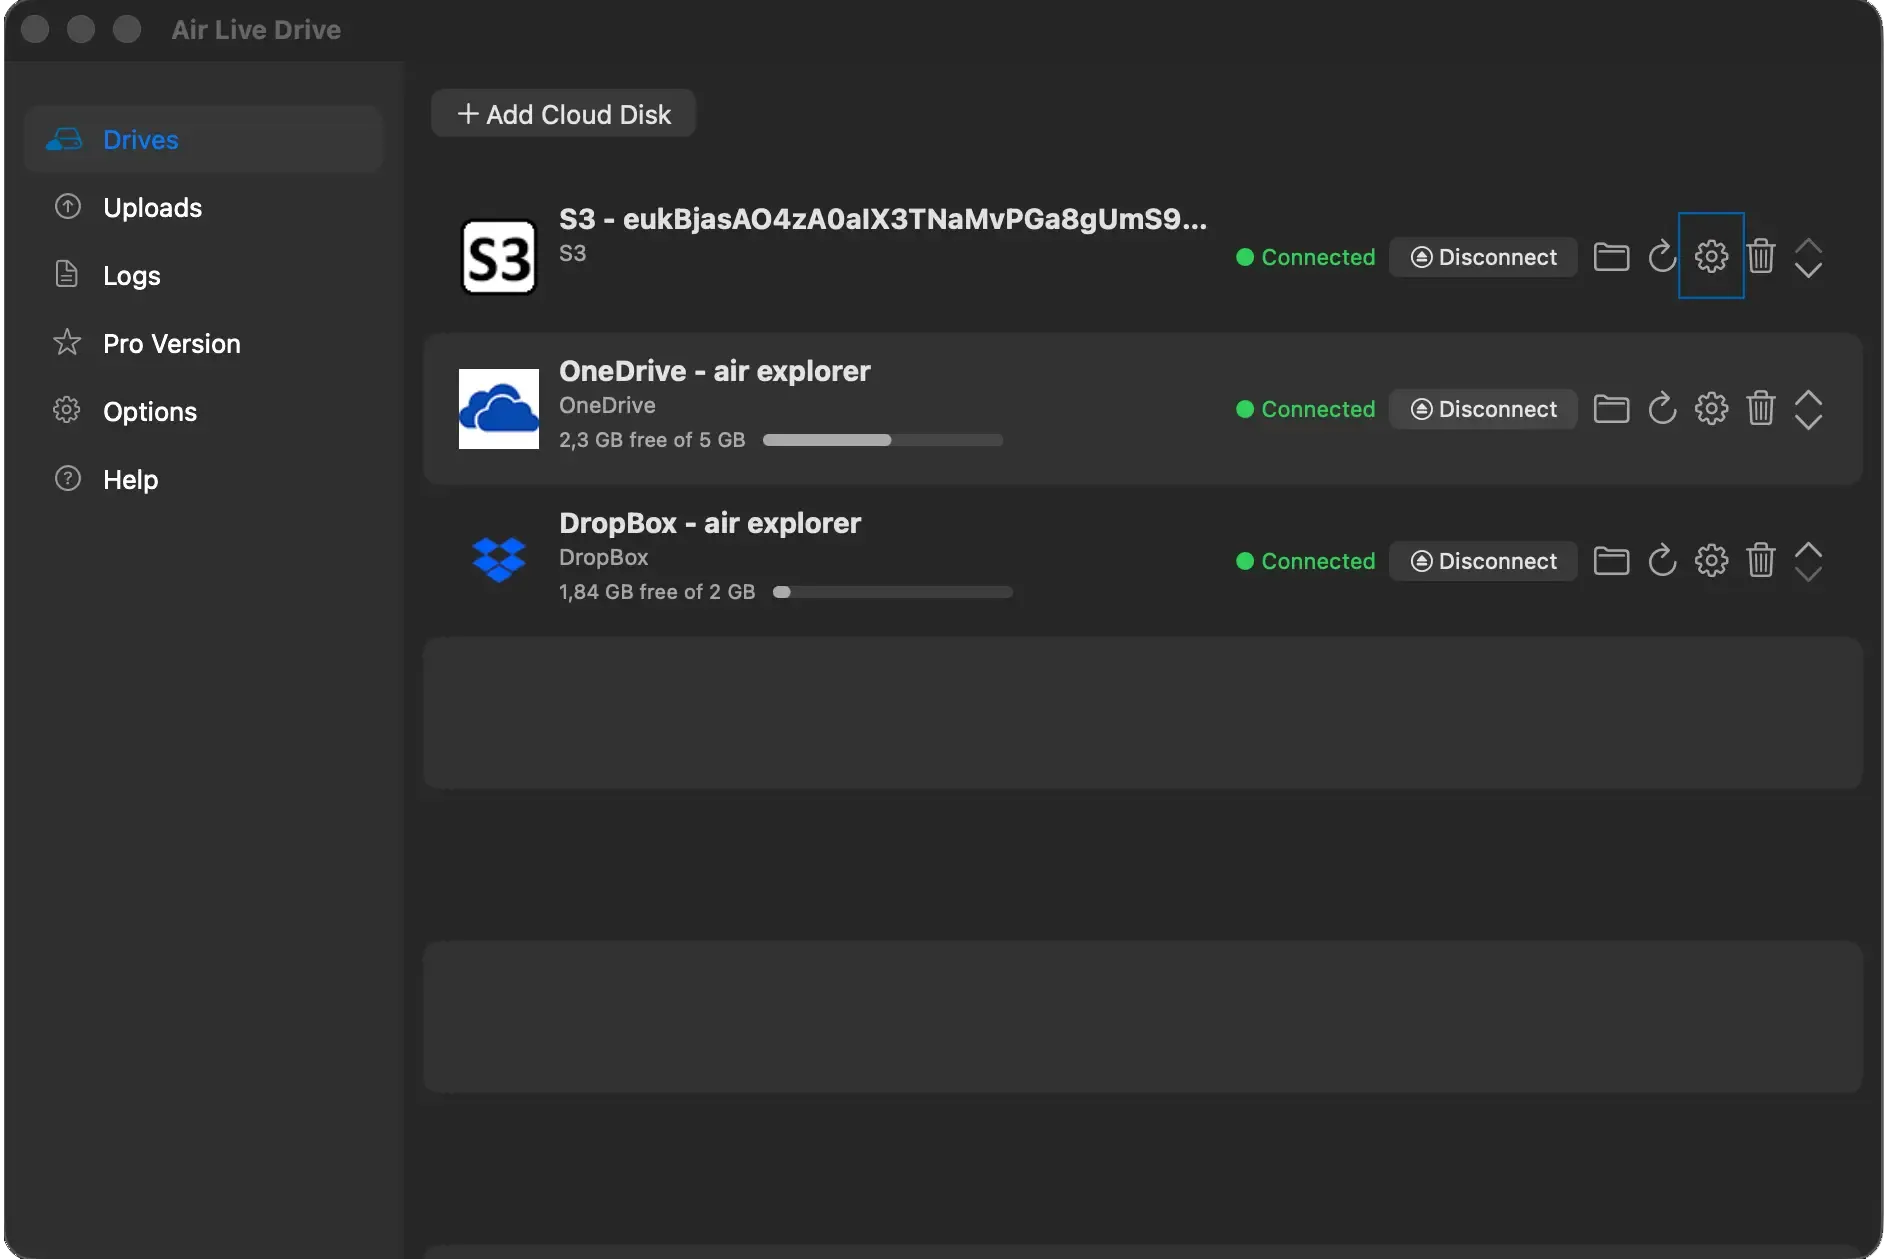
Set a display name, connect the drive automatically at startup and use read-only mode when files must not be changed from the mounted drive.
How to do it

  1. Open the drive's settings from the main list before connecting it.
  2. Enter an alias that explains the account, then choose whether it connects automatically when you sign in.
  3. Enable read-only mode for reference material and save the configuration before reconnecting the drive.
Windows
Name, start and protect a drive on Windows
macOS
Name, start and protect a drive on macOS

Choose a drive letter or folder

Windows

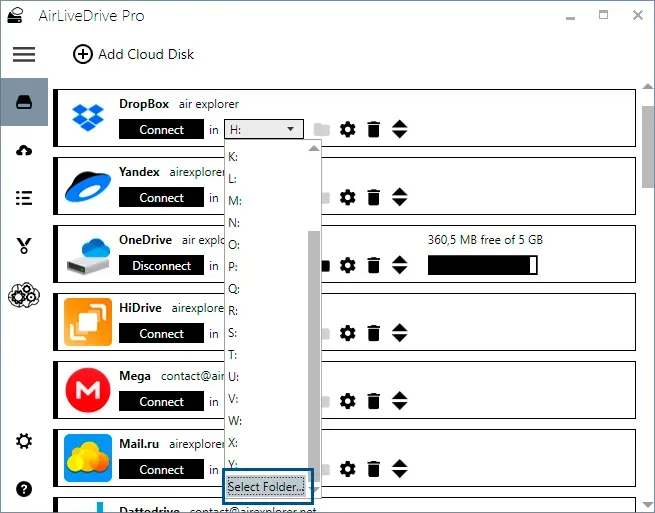
Mount a cloud with a Windows drive letter, or mount it into a local folder when you need more than the available letters.
How to do it

  1. Disconnect the cloud drive and open its Windows configuration.
  2. Choose an unused drive letter, or select an empty local folder as the mount point.
  3. Reconnect the drive and open the selected letter or folder from File Explorer.
Choose a drive letter or folder Mount cloud drives as folders

Private and network drives

Windows

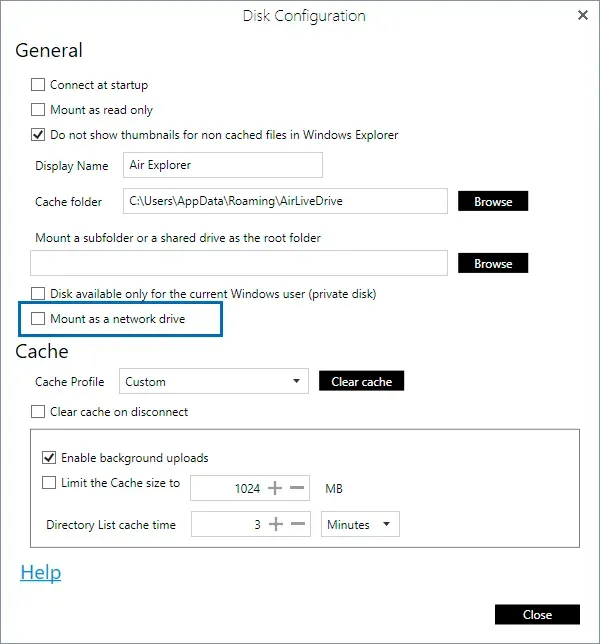
Make a drive available only to the current Windows user or mount it as a network drive. You can also reorder the drive list and review reported free space.
How to do it

  1. Disconnect the drive and open its Windows-only options.
  2. Choose current-user access for a private drive, or enable network-drive mode when your environment requires it.
  3. Save and reconnect, then use the drive list controls to order drives and review the available-space display.
Private and network drives Mount a network drive
04

Work with files

Use cloud files through your file manager and the desktop applications you already know.

Open and edit files directly

WindowsmacOS

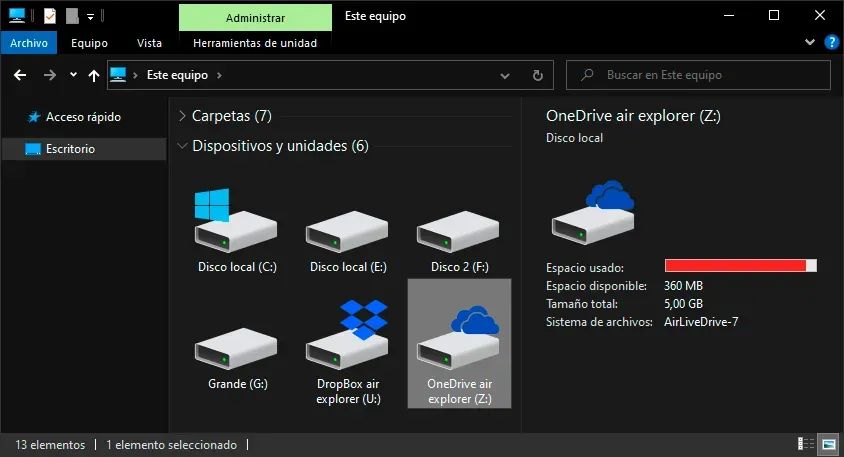
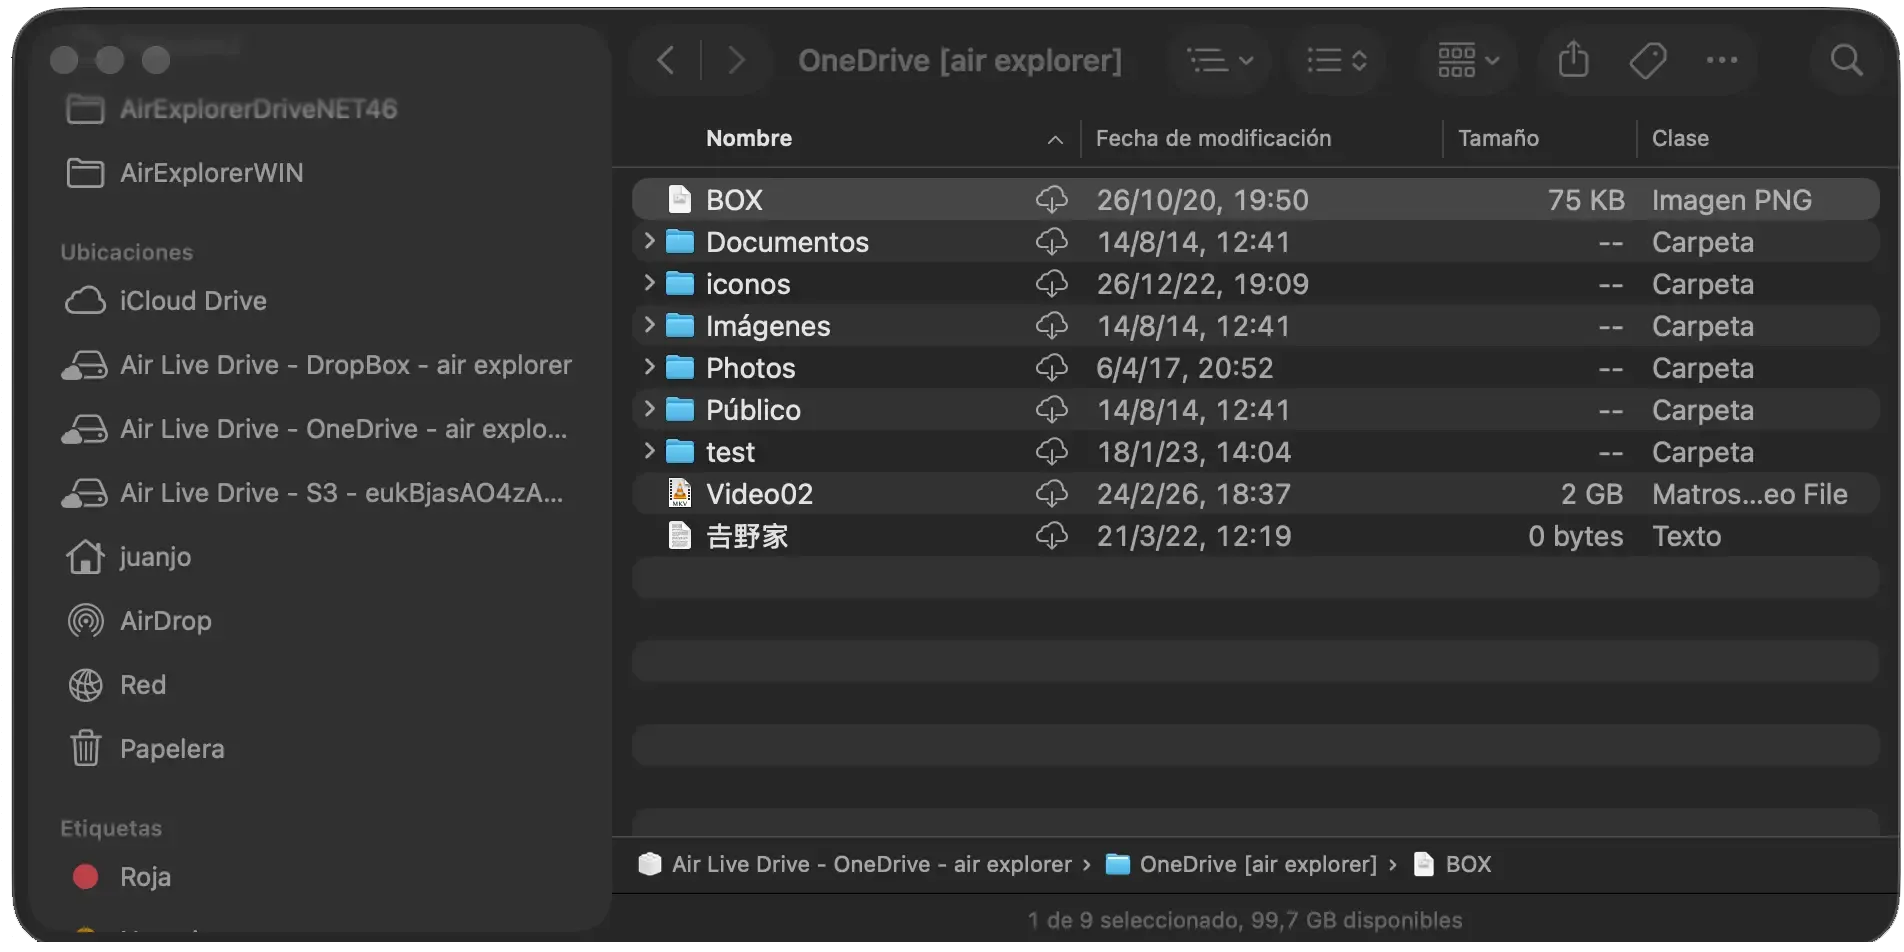
Open documents, images and project files from a connected drive with your normal applications. Saving writes the changes back to the cloud.
How to do it

  1. Connect the drive and browse to the file in Explorer or Finder.
  2. Open it with the desktop application you normally use, such as Word, Excel or Photoshop.
  3. Save your changes and keep the drive connected until the upload is complete.
Windows
Open and edit files directly on Windows
macOS
Open and edit files directly on macOS
Edit files without downloading

Follow uploads

WindowsmacOS

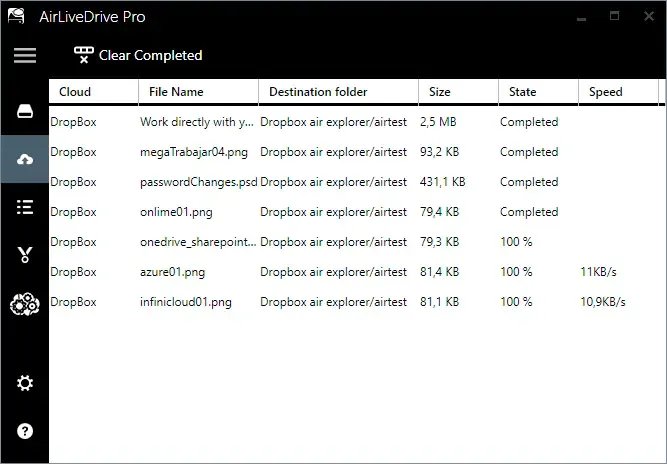
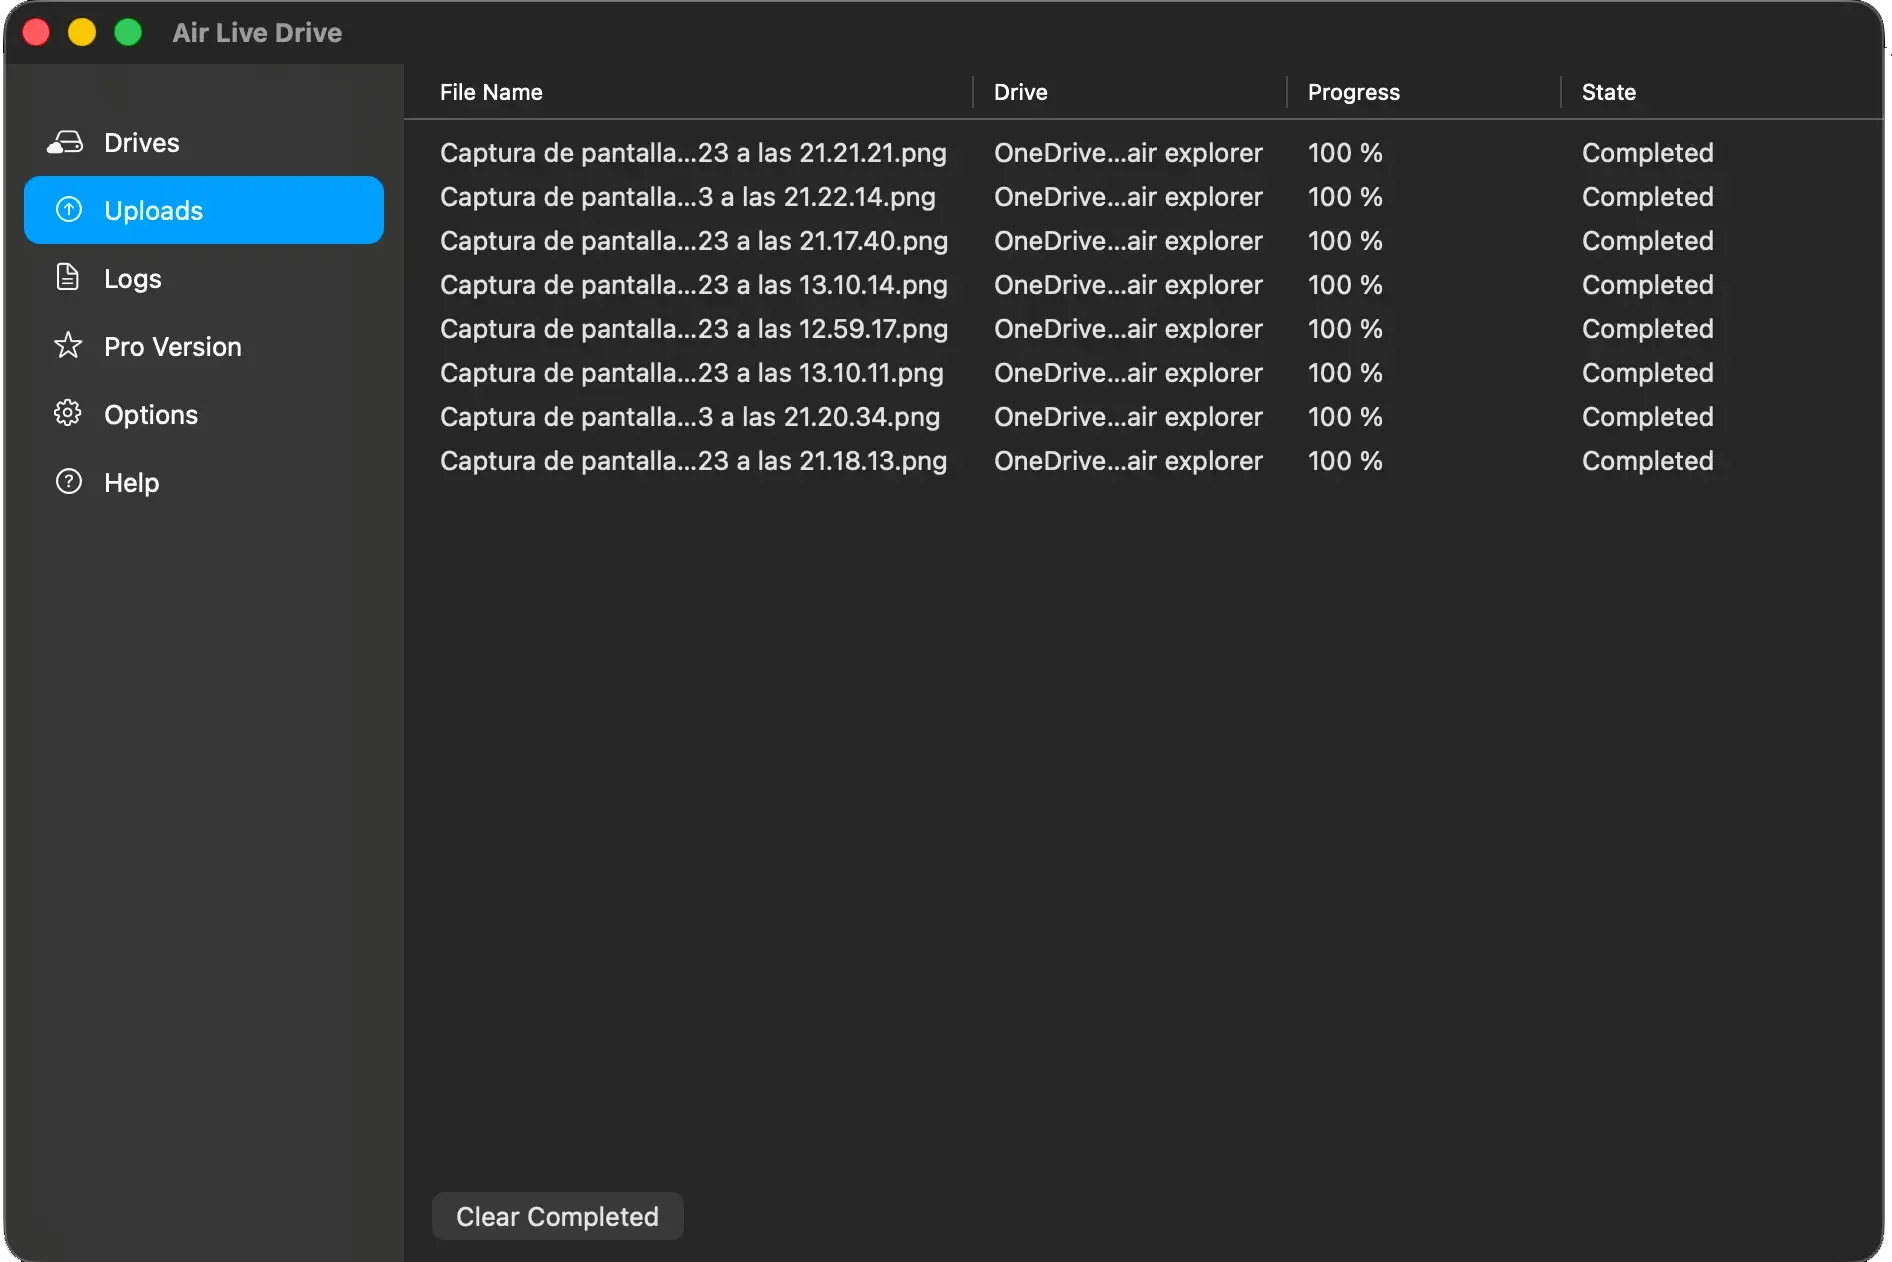
Copy or save files to a connected drive and review their upload progress. Keep Air Live Drive open until pending uploads finish.
How to do it

  1. Copy, move or save a file into the connected drive as you would with a local folder.
  2. Open Air Live Drive and check the upload or transfer list while the file is being sent.
  3. Wait for pending uploads to finish before disconnecting the drive, closing the app or turning off the computer.
Windows
Follow uploads on Windows
macOS
Follow uploads on macOS

Refresh cloud folders

WindowsmacOS

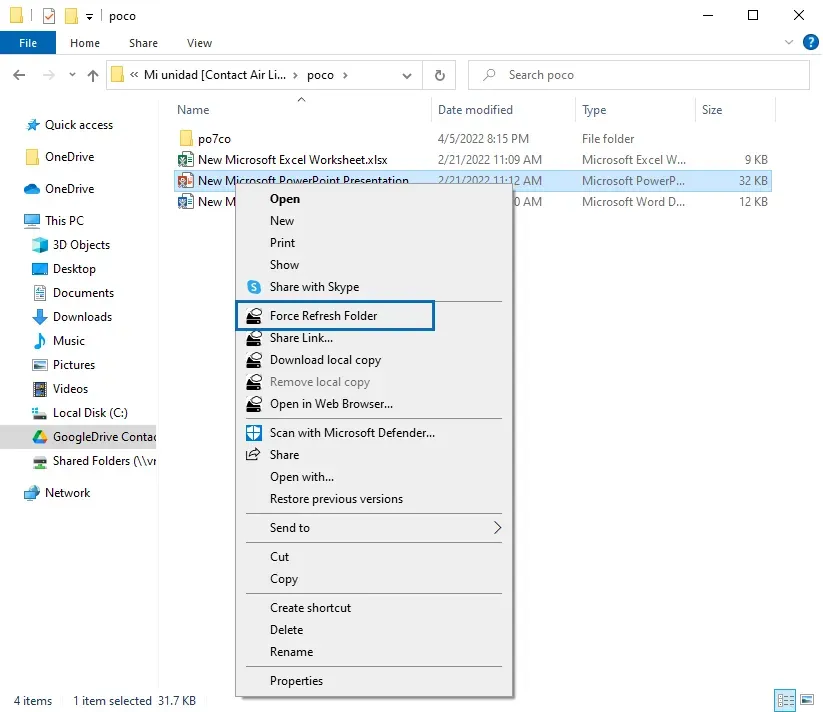
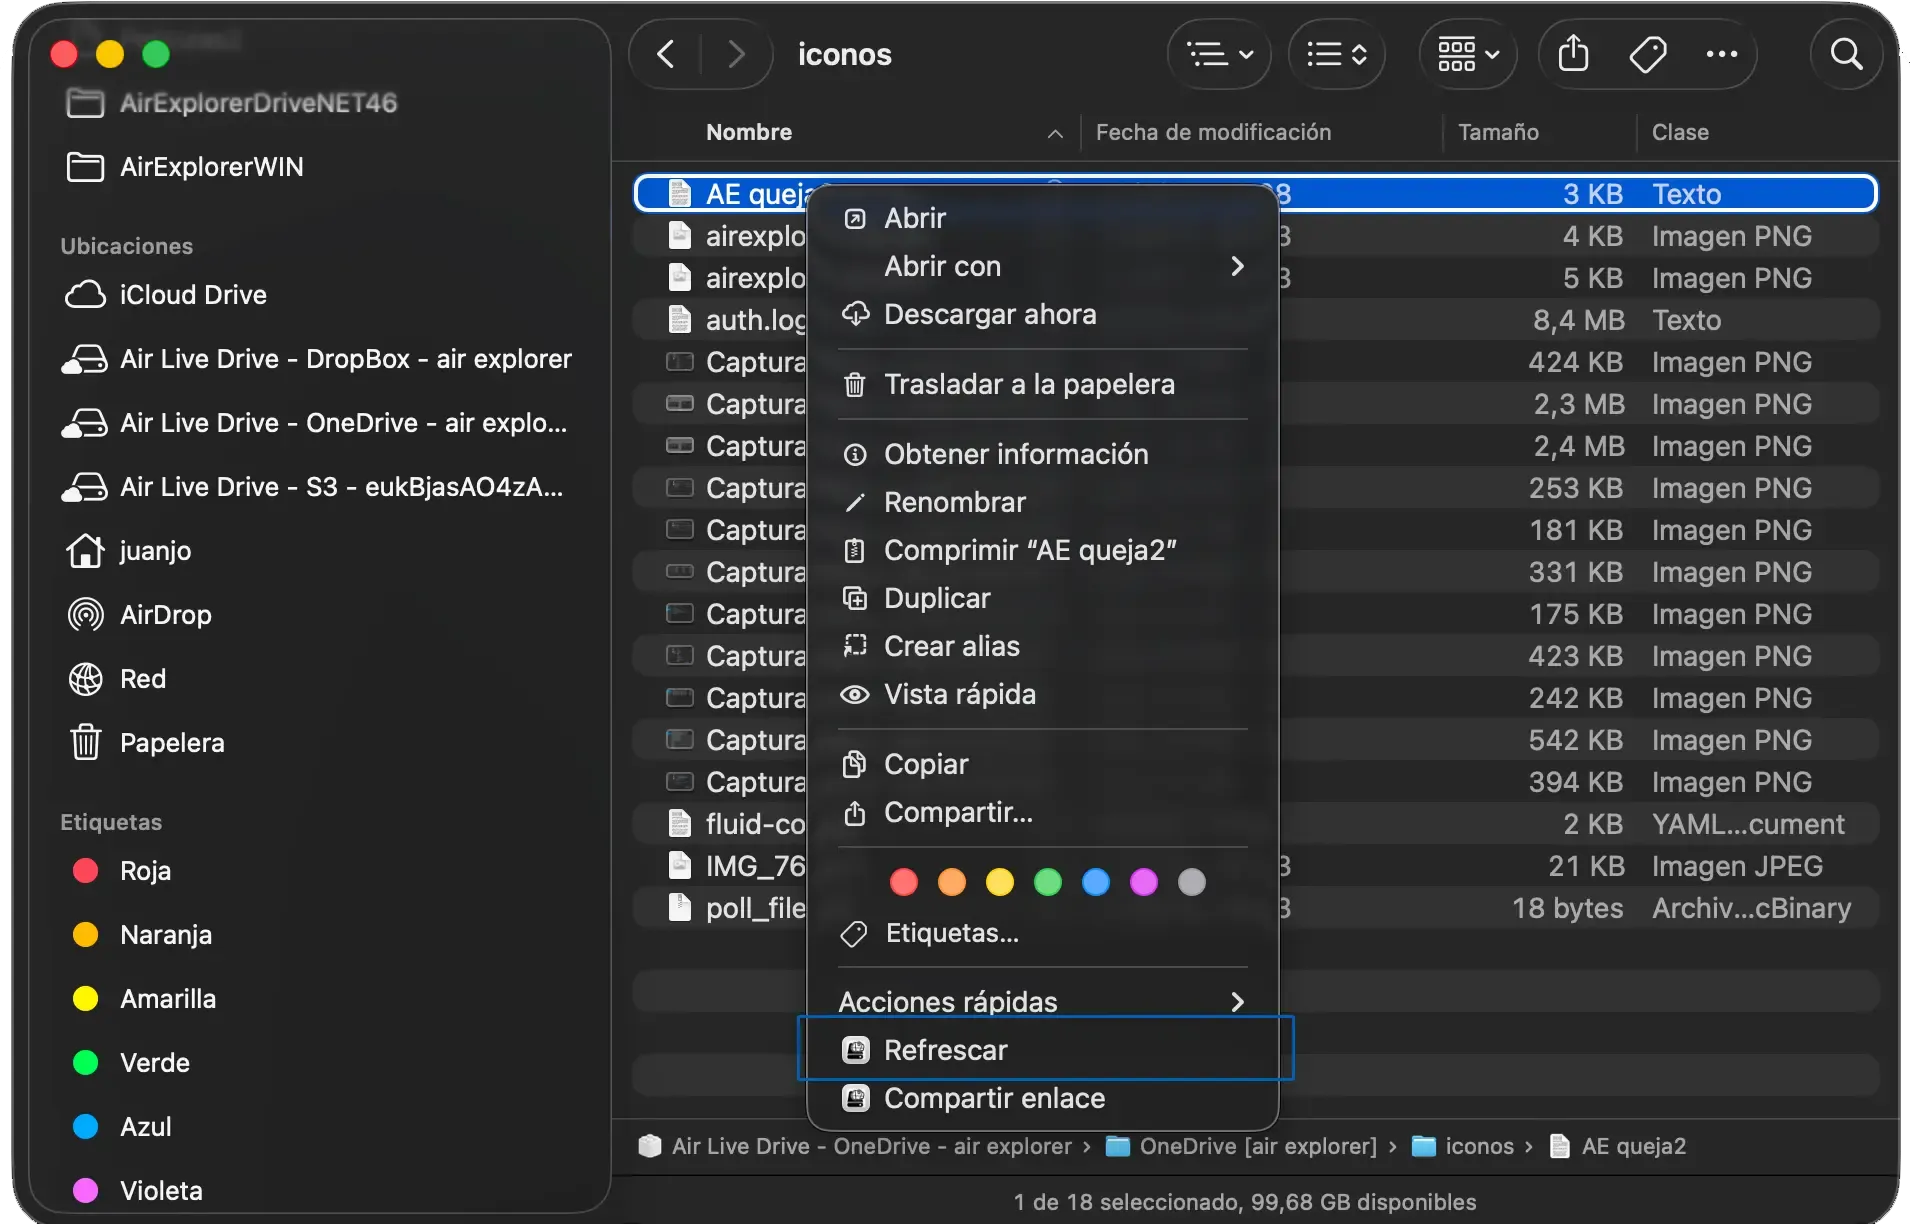
Refresh a drive or folder to show changes made from another device or from the provider’s website.
How to do it

  1. Open the relevant folder in Explorer or Finder after the cloud drive is connected.
  2. Use Refresh from the file manager or the Air Live Drive action for the drive.
  3. Wait for the listing to update, then reopen the folder if you need to confirm new or changed items.
Windows
Refresh cloud folders on Windows
macOS
Refresh cloud folders on macOS
Refresh a cloud folder

Share links and open in the browser

Windows

Use the Windows Explorer context menu to create a shared link or open a supported cloud item in its web service.

How to do it

  1. In File Explorer, right-click the file or folder in a connected drive.
  2. Choose the Air Live Drive sharing or browser action shown in the context menu.
  3. Copy the generated link or complete sharing in the provider's web page, depending on the cloud service.
Share links with Air Live Drive

Play cloud video online

WindowsmacOS

Play supported video or audio files from the cloud without first creating a full local copy. Availability depends on the cloud provider.

How to do it

  1. Connect the account and locate a video or audio file supported by both the provider and the player action.
  2. Use the online playback action from the file manager or open the item in the provider's browser view.
  3. If playback is unavailable, download a local copy or use the provider's own web player instead.
Play cloud videos online
05

Cache and local files

Balance speed, disk space and offline copies according to the operating system you use.

Configure Windows cache profiles

Windows

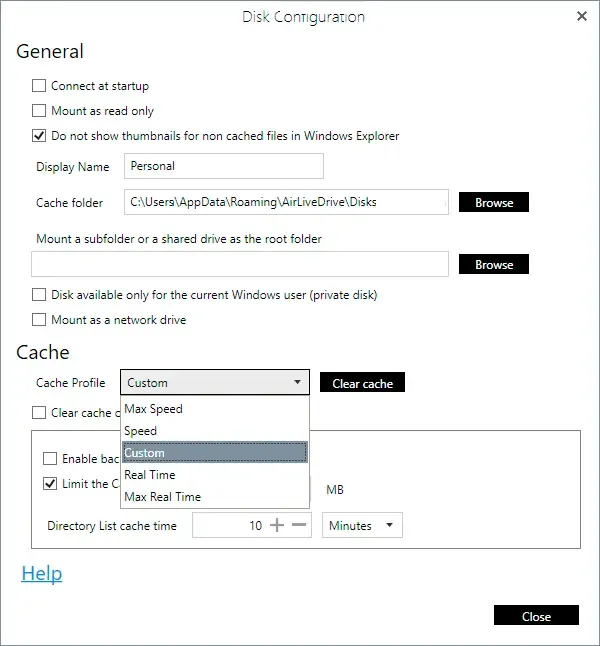
Choose a cache profile, limit its size, select its location, set a folder-list refresh interval and clear the cache when you need space or a fresh copy.
How to do it

  1. Open the drive's cache settings before connecting it, then choose the profile that matches your speed and offline needs.
  2. Set a safe size limit and select a local cache location with enough free space.
  3. Apply the settings, reconnect the drive and clear the cache from the same area whenever a fresh copy is needed.
Configure Windows cache profiles Read the cache management guide

Manage local copies in Windows

Windows

From Explorer, download a local copy for faster access or remove it to free space. You can also clear cache automatically when disconnecting a drive.

How to do it

  1. Right-click a file or folder in the connected cloud drive in File Explorer.
  2. Choose the local-copy action to keep it available locally when you need faster or offline access.
  3. Use the remove-local-copy action when you are done, or enable cache cleanup when disconnecting the drive.

Use background uploads

Windows

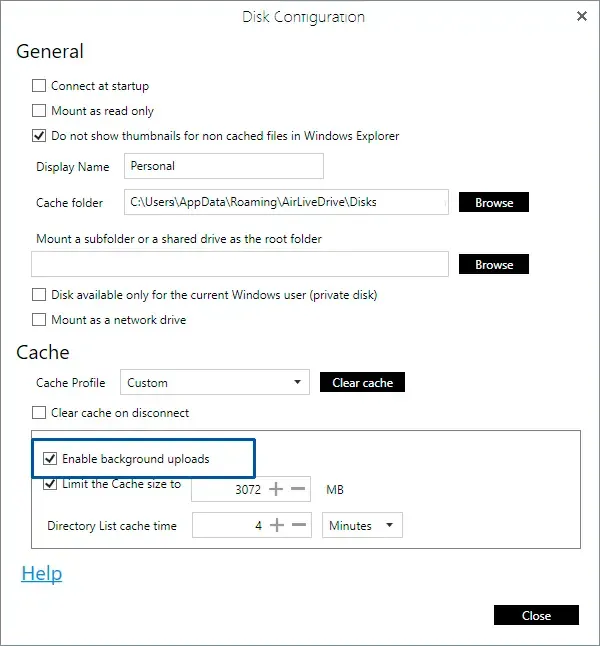
Enable background uploads to keep working while Air Live Drive sends changes to the cloud, then check the upload list before quitting.
How to do it

  1. Open the Windows drive settings and enable the background-upload option when it is appropriate for your workflow.
  2. Continue working in Explorer while Air Live Drive uploads changed files in the background.
  3. Review the upload list for completed or failed items before you disconnect the drive or exit the application.
Use background uploads

Manage downloads in Finder

macOS

macOS manages local file materialization. Use Finder’s Remove Download action to release local space while keeping the cloud file available.

How to do it

  1. Connect the cloud account and open its location in Finder.
  2. Open or download the files you need; macOS materializes local copies when required.
  3. Select a file or folder and use Finder's Remove Download action to release local space without deleting it from the cloud.

Set folder refresh time

WindowsmacOS

Adjust how often Air Live Drive checks cloud folder listings when you need faster browsing or more immediate visibility of remote changes.

How to do it

  1. Open the cache or connection settings for the drive you want to adjust.
  2. Choose a shorter interval for folders that change often, or a longer interval to reduce checks.
  3. Save the setting, then use Refresh manually whenever you need to see a remote change immediately.
06

Automation and settings

Adapt Air Live Drive to your sign-in routine, interface preferences and repeatable workflows.

Start with your computer

WindowsmacOS

Launch Air Live Drive when you sign in and configure selected drives to connect automatically. macOS uses Login Items; Windows can start minimized.

How to do it

  1. Open the app preferences and enable launch at sign-in or startup.
  2. On macOS, confirm Air Live Drive is allowed in Login Items; on Windows, choose whether it starts minimized.
  3. For each drive you need every day, enable automatic connection and test it after a sign-out or restart.

Use the tray or menu bar

WindowsmacOS

Open the main window, connect, disconnect, browse or refresh drives from the Windows notification area or the macOS menu bar.

How to do it

  1. Find the Air Live Drive icon in the Windows notification area or the macOS menu bar.
  2. Open the menu to connect, disconnect, browse or refresh a configured drive without opening the full app first.
  3. Use Open or Settings from the same menu when you need to change a drive's configuration.

Language, theme and updates

WindowsmacOS

Choose the application language and appearance, then use the Help or About area to check for available updates.
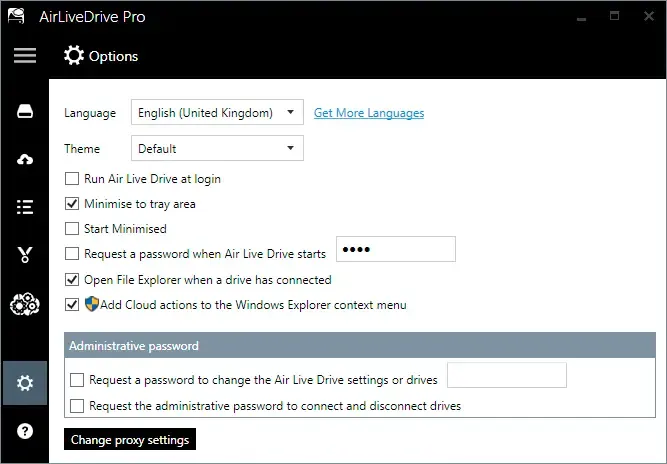
How to do it

  1. Open Preferences or Settings from the Air Live Drive main window.
  2. Select the language and appearance that you want to use, then save the changes.
  3. Visit Help or About periodically, check for updates and restart the application when an update asks you to.
Language, theme and updates

Configure a proxy

Windows

Use a proxy when your company or institution network requires one for Air Live Drive to access cloud services.
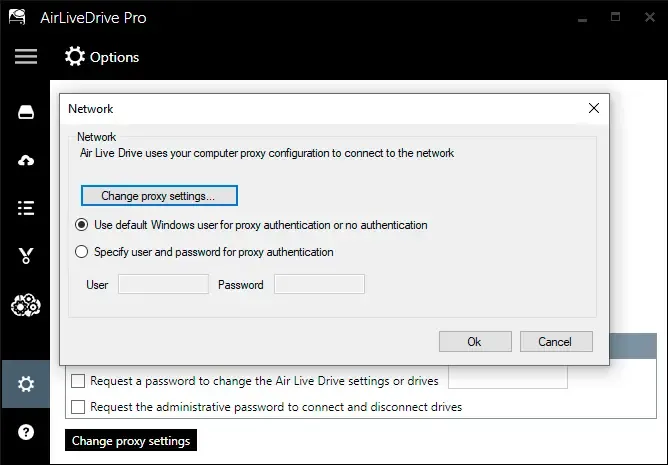
How to do it

  1. Open the Air Live Drive settings in Windows and locate the proxy configuration.
  2. Enter the address, port and, when required, the credentials provided by your network administrator.
  3. Save the settings and connect a drive to confirm that it can access the cloud service.
Configure a proxy

Import and export accounts

Windows

Save your configured drives to a file so you can move them to another Windows computer or keep a backup of the configuration.
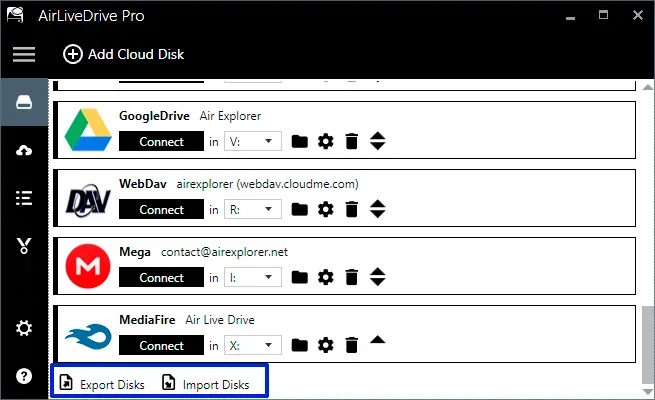
How to do it

  1. Export the configured drives before changing computers or making major changes.
  2. Copy the exported file to the destination Windows computer and install Air Live Drive there.
  3. Import the configuration, then reconnect each account if the provider asks you to sign in again.
Import and export accounts Export and import accounts

Automate Windows from the command line

Windows Pro

Use AirLiveDrive.exe to mount or unmount a drive; Pro also enables refresh and cache commands for automation scripts.

How to do it

  1. Open Command Prompt or a script on the Windows computer where Air Live Drive is installed.
  2. Run the AirLiveDrive.exe command for the configured drive action you need, such as mount or unmount.
  3. Test the command interactively before adding it to Task Scheduler or another automation tool; use Pro commands when required.
Use the command line
07

Security and support

Protect access, understand plan limits and send information that helps us investigate genuine issues.

Protect Air Live Drive with passwords

WindowsmacOS Pro

Set a startup password, protect settings with an administrator password and optionally require it before connecting or disconnecting drives.

How to do it

  1. Open the security or administrator-password settings from the Air Live Drive main window.
  2. Create a strong password and choose which actions require it, such as opening settings or connecting a drive.
  3. Store the password safely and test the selected protection after restarting the app.
Configure an administrator password

Fix mounting problems

WindowsmacOS

On Windows, reinstall Air Live Drive if Dokan is missing. On macOS, enable the File Provider extension in System Settings before connecting drives.

How to do it

  1. Check the exact message and confirm that the cloud account can still sign in through its provider.
  2. On Windows, reinstall Air Live Drive if the message mentions Dokan; on macOS, enable File Provider in System Settings.
  3. Restart Air Live Drive, reconnect the drive and collect logs only if the issue remains reproducible.

Check logs before reporting

WindowsmacOS

Open the Logs view, copy the relevant entries and include them with a reproducible error report when possible.
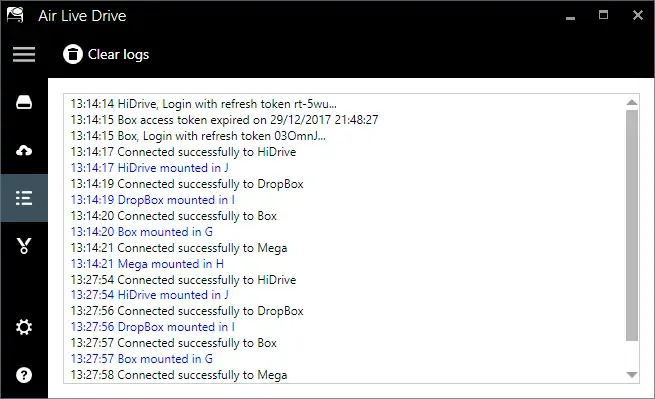
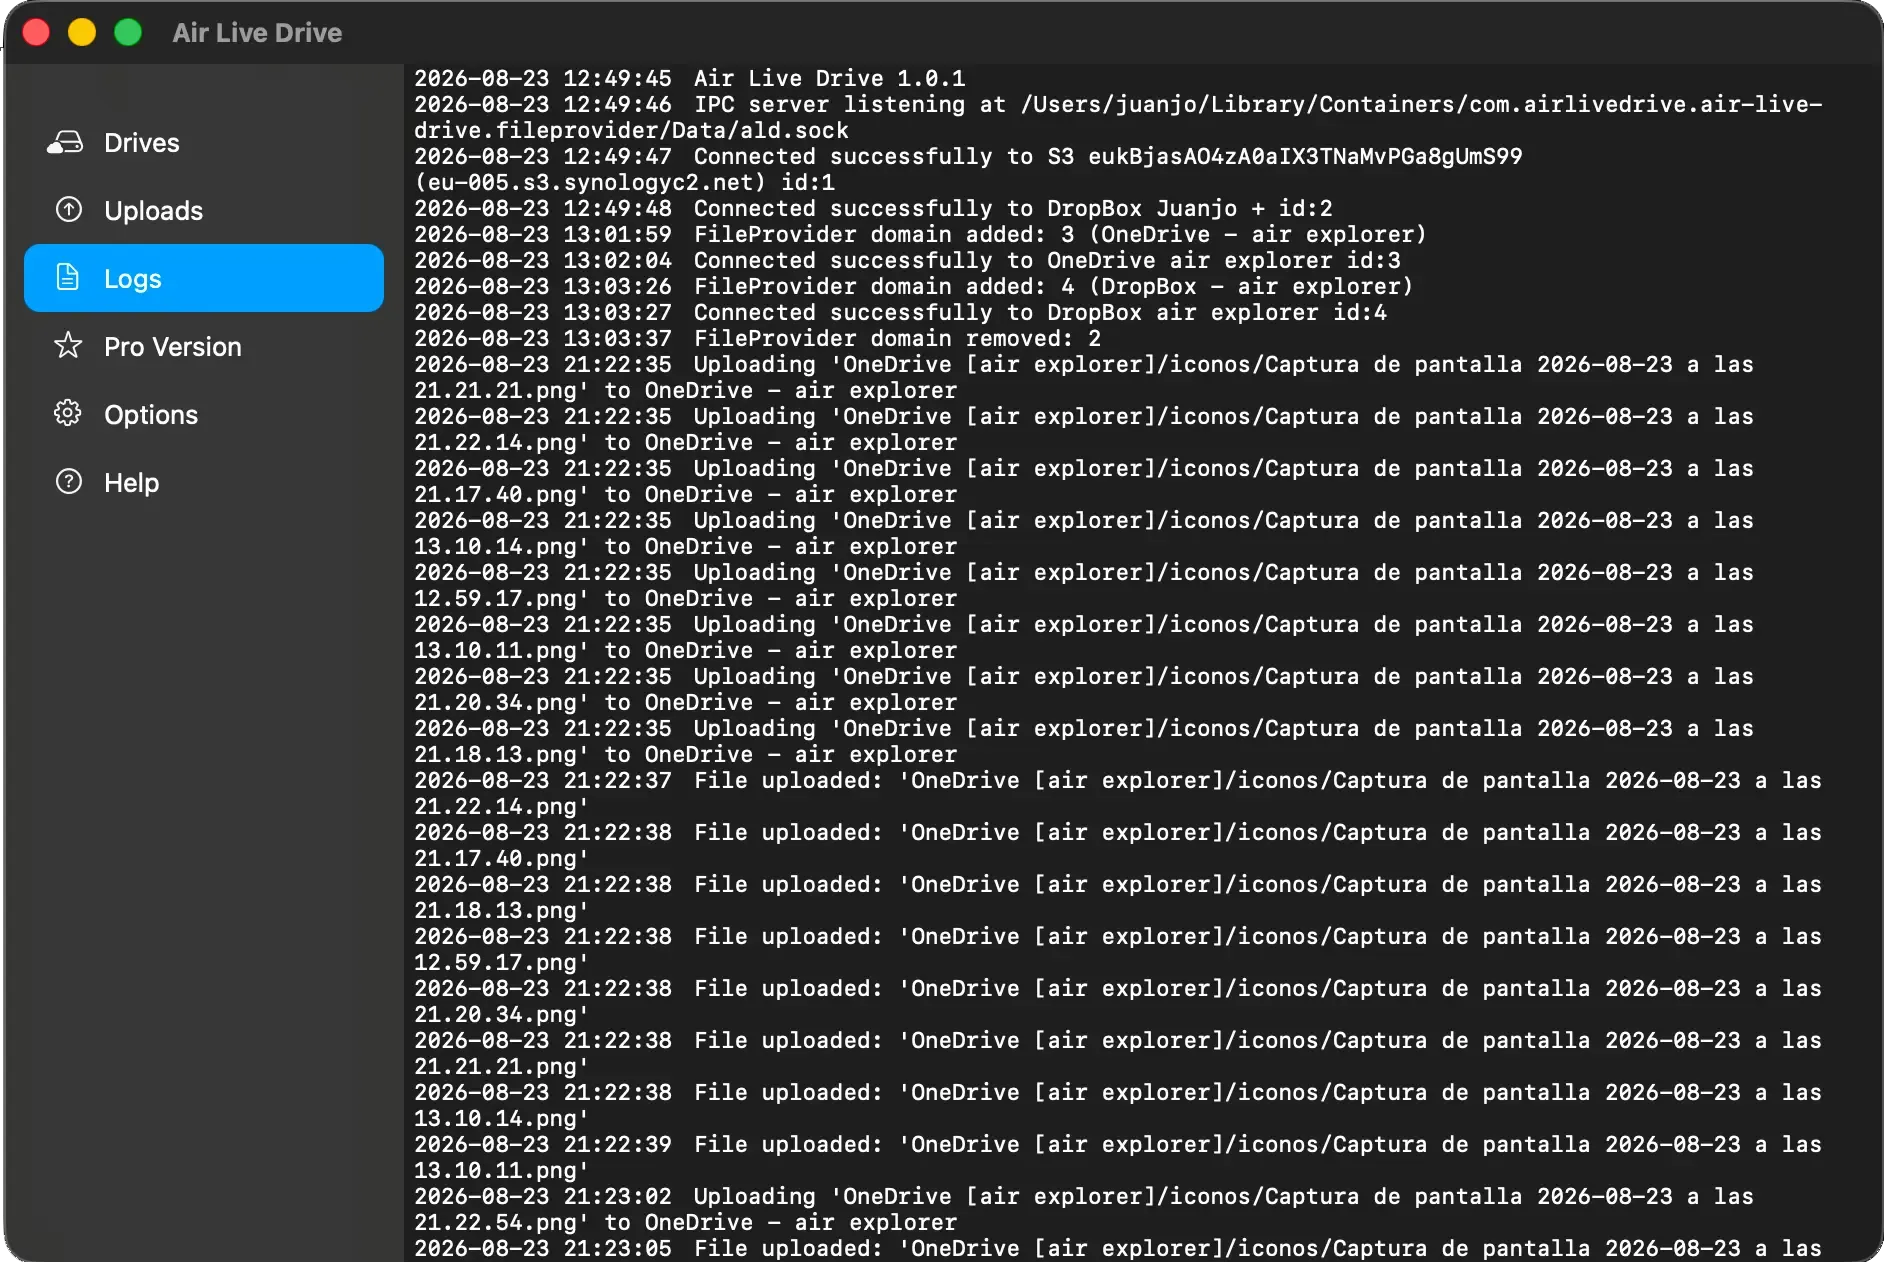
How to do it

  1. Repeat the problem once, noting the approximate time and the action that triggered it.
  2. Open the Logs view in Air Live Drive and copy the entries around that time.
  3. Keep the log excerpt with the app version, operating system and cloud service so it can be matched to the report.
Windows
Check logs before reporting on Windows
macOS
Check logs before reporting on macOS

Report errors and suggestions

WindowsmacOS

Use the reporting guide to tell us about a reproducible problem or a suggestion. We do not provide personalized support, but we review the reproducible issues, bugs and improvement proposals you send us.

How to do it

  1. First check whether you can reproduce the error and write the shortest sequence of actions that causes it.
  2. Collect the Air Live Drive version, operating system, cloud service, expected result, actual result, screenshots and relevant logs.
  3. Send that information through the reporting guide. Personalized support is not provided, but reproducible errors, bugs and suggestions are reviewed.
Read the error reporting guide

Frequently asked questions

Why does Air Live Drive install Dokan on Windows?

Dokan lets Air Live Drive present cloud accounts as drives in Windows Explorer. It is installed automatically with Air Live Drive; reinstall the application if Windows reports it is missing.

Why do I need to enable Air Live Drive in macOS settings?

macOS needs permission for the Air Live Drive File Provider extension before Finder can show connected cloud drives.

Does Air Live Drive keep a full local copy of my cloud?

No. Windows uses configurable cache and macOS lets Finder manage local downloads, so you only keep local files when they are needed.

Can I add more than one account?

Yes. Pro allows unlimited cloud drives and more than one account from the same provider. The free version allows up to three drives and one account per provider.

What type of support is available?

We review reports of reproducible errors, bugs and suggestions. Air Live Drive does not provide personalized support.